> ## Documentation Index
> Fetch the complete documentation index at: https://docs.duitpos.com/llms.txt
> Use this file to discover all available pages before exploring further.
# Payment Types
> Set up the payment methods available at your POS and online ordering, and attach the processors that power them.
A **Payment Type** represents one payment method your business accepts — Cash, Credit Card, Stripe, and so on. Each type can have zero or more **processors** attached to actually move the money (or, for cash, no processor at all — the cashier just records the amount tendered). Payment types appear as buttons at checkout on both the POS terminal and the online QR ordering page.
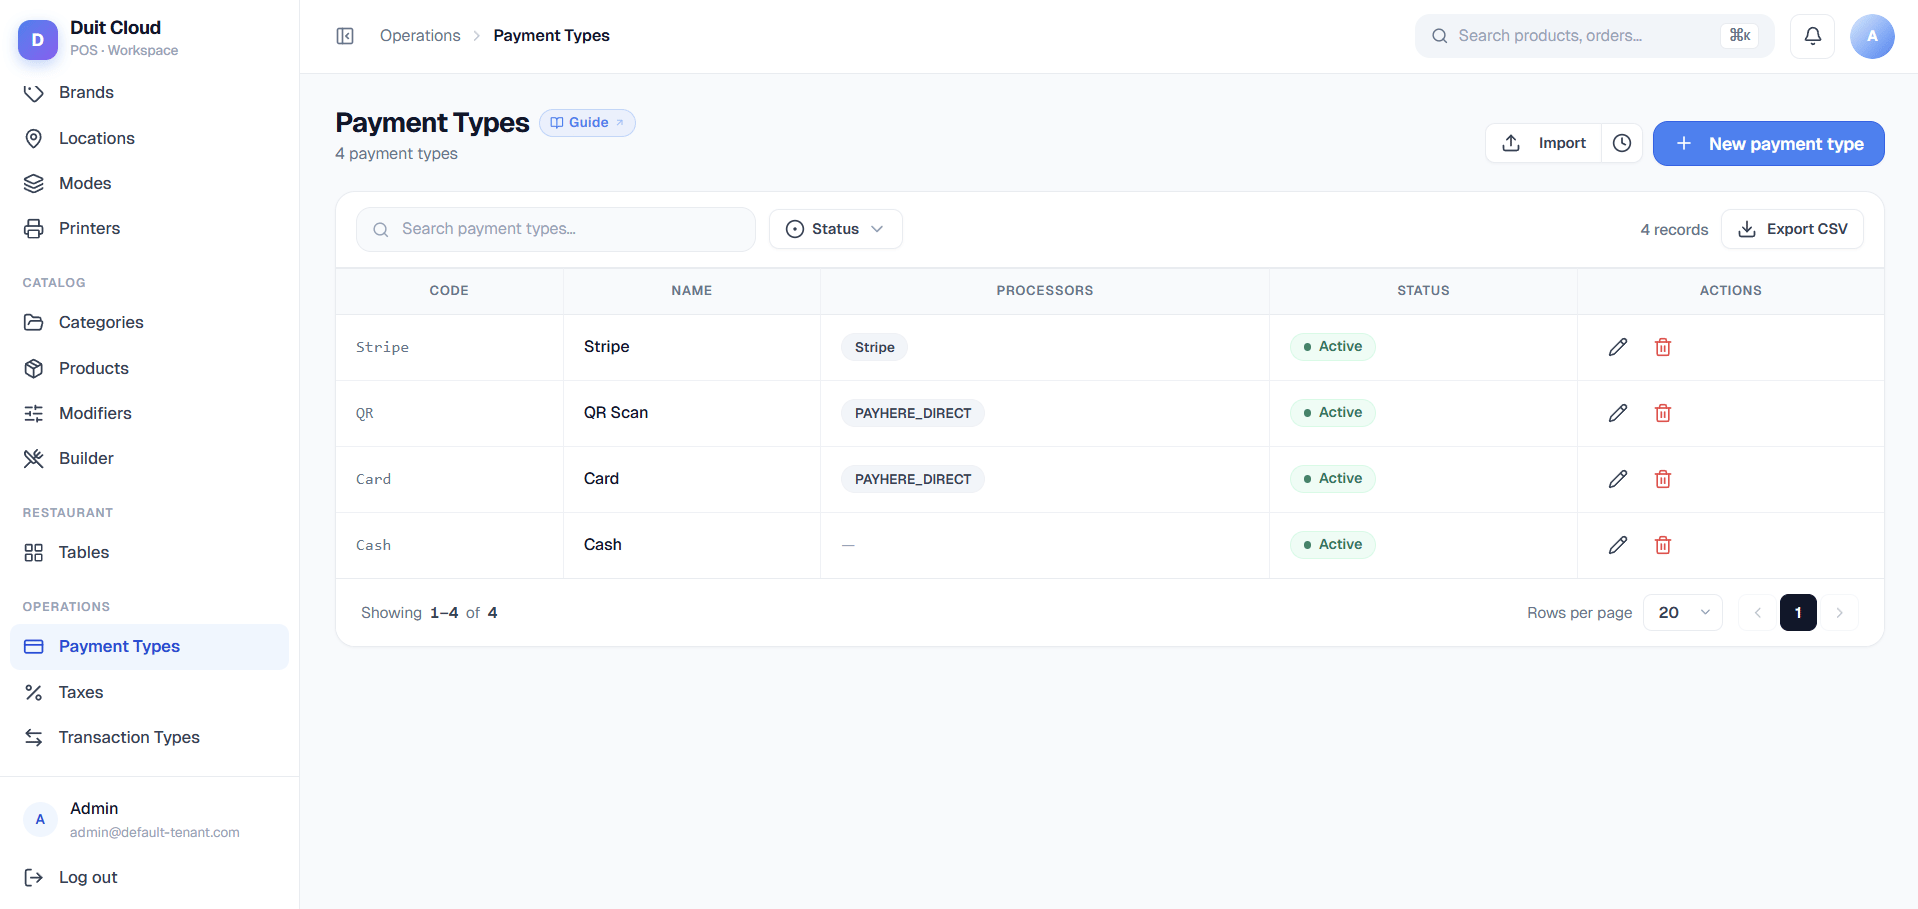 ## Payment Type Fields
| Field | Required | Description |
| ---------------- | -------- | --------------------------------------------------------------------------------------------------------------------------------------------------------------------------------------------------------------------------------------------- |
| **Code** | Yes | A short internal identifier, e.g. `CASH` or `CARD`. Must be unique. Shown in reports and exports but not to customers |
| **Name** | Yes | The display name shown on the POS checkout screen and receipts, e.g. `Cash` or `Credit Card` |
| **Group Code** | No | A free-text label POS uses to visually group payment buttons that share it — e.g. give every card-based tender the same group code so they cluster together on the checkout screen instead of being scattered among cash and e-wallet buttons |
| **Fast Payment** | No | Switch on to show a one-tap settle button for this payment type on the POS — good for cash or whichever single tender is your default, so staff don't have to open the full payment screen for the common case |
| **Active** | No | Toggle off to hide this payment type from the POS without deleting it. Historical data is preserved |
Use clear, consistent codes that match your reporting needs — `CASH`, `CARD`, `EWALLET`, `ONLINE` rather than numbers or abbreviations that may confuse staff reading reports later. Group Code and Fast Payment are purely presentational: they change how the button looks and behaves on the POS, not how the payment is processed.
## Create a Payment Type
Click **Payment Types** in the left sidebar under Manage.
Fill in the Code, Name, Group Code, Fast Payment, and Active fields.
Click **Create**. The payment type appears in the list immediately and is available on the POS.
## Attach a Processor
Processors handle the actual transaction for non-cash payment types. The **Add processor** dropdown on the edit screen is populated dynamically from the backend — it lists whatever processor types are enabled for your account, so the exact set you see may differ from another tenant's. Commonly available processors include **Stripe**, **Share Commerce**, and **Share Commerce ePay** — see [Two Share Commerce Processors](#two-share-commerce-processors) below before picking between the latter two.
Each processor you add gets its own configuration panel with whatever fields that processor needs — a mix of text inputs, checkboxes, and dropdowns supplied by the backend. Some processors need no configuration at all, in which case the panel simply reads **"No configuration required."**
Click the **Edit** (pencil) icon next to the payment type.
In the Processors section, click **Add processor**, choose one from the dropdown (e.g. *Stripe*, *Share Commerce*, or *Share Commerce ePay*), and it's added to the list below with its own config panel.
Enter whatever fields that processor asks for. For example:
* **Stripe**: **Secret Key** and **Webhook Secret**
* **Share Commerce**: **Terminal IP Address**, **Terminal Port** (default `8890`), and **Terminal Model** (`A90 Pro` or `MF919 Pro`)
* **Share Commerce ePay**: **Merchant ID**, **Secret Key**, and **Environment** (staging or production)
All credentials are encrypted with AES-256 before saving — they are never stored in plain text.
Click **Save Processors**. The processor is now active for that payment type.
Nothing stops you from attaching more than one processor to the same payment type, but that's not typical usage — most restaurants doing both dine-in card and online/QR ordering end up creating **two separate payment types**: one for the in-person terminal (Share Commerce) and one for online (Stripe or Share Commerce ePay). Keeping them separate makes reports easier to read, since payment type is what shows up in your sales breakdowns.
Never share your API credentials. They are masked (`••••••`) after saving. To update a credential, enter a new value — leaving it blank keeps the existing one. If you believe your credentials have been compromised, rotate them immediately in your payment gateway dashboard and update them here.
## Two Share Commerce Processors
The "Add processor" dropdown lists **Share Commerce** and **Share Commerce ePay** as two separate entries, and it's easy to pick the wrong one since the names look nearly identical. They do very different jobs:
**Share Commerce** = physical countertop card terminal, tap goes here. **Share Commerce ePay** = online gateway, no device, customer pays from their phone after scanning a QR.
| | Share Commerce | Share Commerce ePay |
| -------------------------------- | --------------------------------------------------------------------------------------------- | -------------------------------------------------------------- |
| **What it's for** | The physical card/EDC terminal sitting at your counter | The online/QR-ordering payment gateway |
| **Where the customer pays** | Taps or inserts their card on the terminal, in person | Their own phone, after scanning a QR code — no device involved |
| **Fields** | Terminal IP Address, Terminal Port (default `8890`), Terminal Model (`A90 Pro` / `MF919 Pro`) | Merchant ID, Secret Key, Environment (staging/production) |
| **Requires a merchant account?** | No — it's a local network device you're pointing DuitPOS at | Yes — issued by Share Commerce |
| **Setup guide** | This page — no separate config needed beyond the fields above | [Share Commerce Setup](/online-ordering/sharecommerce-setup) |
The dropdown may render these with their raw internal labels — "ShareCommerce" for the terminal and "ShareCommerce E-Payment" for the online gateway. If in doubt, check the fields that appear after adding one: **Terminal IP Address** means you picked the physical terminal; **Merchant ID** means you picked the online gateway (ePay).
**Rule of thumb**: customer tapping or inserting a card at the counter → **Share Commerce**. Customer paying from their own phone after a QR scan → **Share Commerce ePay**.
## Deactivate vs Delete
| Action | Effect |
| ---------------------------------- | ---------------------------------------------------------------------------------- |
| **Deactivate** (toggle Active off) | Hides from POS and online checkout, preserves all historical data |
| **Delete** | Permanently removes — only possible if no transactions reference this payment type |
Deleting a payment type that has been used in past transactions is not allowed. Deactivate it instead to keep your historical records intact.
## Frequently Asked Questions
The list is backend-driven, so it can vary by account, but commonly available processors include:
* **Stripe**: Credit/debit cards via Stripe Checkout, for online ordering
* **Share Commerce**: Physical countertop card terminal, for in-person POS payments
* **Share Commerce ePay**: Online payment gateway, for QR/web ordering
Contact your account manager if you need a processor that isn't in your dropdown.
Check these things in order:
**For Stripe:**
1. Your Secret Key starts with `sk_live_` (production) or `sk_test_` (testing) — don't mix them
2. The Webhook Secret starts with `whsec_` and matches exactly what is shown in Stripe Dashboard → Developers → Webhooks → your endpoint → Signing secret
3. Your payment type is set to Active
**For Share Commerce (terminal):**
1. The Terminal IP Address is correct and the terminal is on the same network as your POS
2. The Terminal Port matches what's configured on the device (default `8890`)
3. The Terminal Model selected matches your actual hardware
**For Share Commerce ePay:**
1. Your Merchant ID and Secret Key are correct for the selected Environment (staging vs. production)
2. Your merchant account is active and verified at Share Commerce
3. Your payment type is set to Active
See [Payment Issues](/troubleshooting/payment-issues) for more help.
Cash types do not require a processor — the cashier records the amount received and the system calculates change. Card/online types typically have a processor that handles the transaction electronically. You can create as many types as you need (e.g. separate types for Visa and Amex if you want to track them separately).
Log in to [dashboard.stripe.com](https://dashboard.stripe.com), go to **Developers → API keys**. Use the **Secret Key** (not the Publishable Key). See [Stripe Setup](/online-ordering/stripe-setup) for a step-by-step guide.
Log in to your Share Commerce Merchant Portal to find your **Merchant ID** and **Secret Key**. See [Share Commerce Setup](/online-ordering/sharecommerce-setup) for a step-by-step guide. If you're instead setting up the physical countertop terminal, there's no merchant portal step — you just need the terminal's IP address and model.
## Related
Connect Stripe for online payments
Connect Share Commerce ePay for QR/online ordering
Configure general tenant and device settings
Troubleshoot payment problems
## Payment Type Fields
| Field | Required | Description |
| ---------------- | -------- | --------------------------------------------------------------------------------------------------------------------------------------------------------------------------------------------------------------------------------------------- |
| **Code** | Yes | A short internal identifier, e.g. `CASH` or `CARD`. Must be unique. Shown in reports and exports but not to customers |
| **Name** | Yes | The display name shown on the POS checkout screen and receipts, e.g. `Cash` or `Credit Card` |
| **Group Code** | No | A free-text label POS uses to visually group payment buttons that share it — e.g. give every card-based tender the same group code so they cluster together on the checkout screen instead of being scattered among cash and e-wallet buttons |
| **Fast Payment** | No | Switch on to show a one-tap settle button for this payment type on the POS — good for cash or whichever single tender is your default, so staff don't have to open the full payment screen for the common case |
| **Active** | No | Toggle off to hide this payment type from the POS without deleting it. Historical data is preserved |
Use clear, consistent codes that match your reporting needs — `CASH`, `CARD`, `EWALLET`, `ONLINE` rather than numbers or abbreviations that may confuse staff reading reports later. Group Code and Fast Payment are purely presentational: they change how the button looks and behaves on the POS, not how the payment is processed.
## Create a Payment Type
Click **Payment Types** in the left sidebar under Manage.
Fill in the Code, Name, Group Code, Fast Payment, and Active fields.
Click **Create**. The payment type appears in the list immediately and is available on the POS.
## Attach a Processor
Processors handle the actual transaction for non-cash payment types. The **Add processor** dropdown on the edit screen is populated dynamically from the backend — it lists whatever processor types are enabled for your account, so the exact set you see may differ from another tenant's. Commonly available processors include **Stripe**, **Share Commerce**, and **Share Commerce ePay** — see [Two Share Commerce Processors](#two-share-commerce-processors) below before picking between the latter two.
Each processor you add gets its own configuration panel with whatever fields that processor needs — a mix of text inputs, checkboxes, and dropdowns supplied by the backend. Some processors need no configuration at all, in which case the panel simply reads **"No configuration required."**
Click the **Edit** (pencil) icon next to the payment type.
In the Processors section, click **Add processor**, choose one from the dropdown (e.g. *Stripe*, *Share Commerce*, or *Share Commerce ePay*), and it's added to the list below with its own config panel.
Enter whatever fields that processor asks for. For example:
* **Stripe**: **Secret Key** and **Webhook Secret**
* **Share Commerce**: **Terminal IP Address**, **Terminal Port** (default `8890`), and **Terminal Model** (`A90 Pro` or `MF919 Pro`)
* **Share Commerce ePay**: **Merchant ID**, **Secret Key**, and **Environment** (staging or production)
All credentials are encrypted with AES-256 before saving — they are never stored in plain text.
Click **Save Processors**. The processor is now active for that payment type.
Nothing stops you from attaching more than one processor to the same payment type, but that's not typical usage — most restaurants doing both dine-in card and online/QR ordering end up creating **two separate payment types**: one for the in-person terminal (Share Commerce) and one for online (Stripe or Share Commerce ePay). Keeping them separate makes reports easier to read, since payment type is what shows up in your sales breakdowns.
Never share your API credentials. They are masked (`••••••`) after saving. To update a credential, enter a new value — leaving it blank keeps the existing one. If you believe your credentials have been compromised, rotate them immediately in your payment gateway dashboard and update them here.
## Two Share Commerce Processors
The "Add processor" dropdown lists **Share Commerce** and **Share Commerce ePay** as two separate entries, and it's easy to pick the wrong one since the names look nearly identical. They do very different jobs:
**Share Commerce** = physical countertop card terminal, tap goes here. **Share Commerce ePay** = online gateway, no device, customer pays from their phone after scanning a QR.
| | Share Commerce | Share Commerce ePay |
| -------------------------------- | --------------------------------------------------------------------------------------------- | -------------------------------------------------------------- |
| **What it's for** | The physical card/EDC terminal sitting at your counter | The online/QR-ordering payment gateway |
| **Where the customer pays** | Taps or inserts their card on the terminal, in person | Their own phone, after scanning a QR code — no device involved |
| **Fields** | Terminal IP Address, Terminal Port (default `8890`), Terminal Model (`A90 Pro` / `MF919 Pro`) | Merchant ID, Secret Key, Environment (staging/production) |
| **Requires a merchant account?** | No — it's a local network device you're pointing DuitPOS at | Yes — issued by Share Commerce |
| **Setup guide** | This page — no separate config needed beyond the fields above | [Share Commerce Setup](/online-ordering/sharecommerce-setup) |
The dropdown may render these with their raw internal labels — "ShareCommerce" for the terminal and "ShareCommerce E-Payment" for the online gateway. If in doubt, check the fields that appear after adding one: **Terminal IP Address** means you picked the physical terminal; **Merchant ID** means you picked the online gateway (ePay).
**Rule of thumb**: customer tapping or inserting a card at the counter → **Share Commerce**. Customer paying from their own phone after a QR scan → **Share Commerce ePay**.
## Deactivate vs Delete
| Action | Effect |
| ---------------------------------- | ---------------------------------------------------------------------------------- |
| **Deactivate** (toggle Active off) | Hides from POS and online checkout, preserves all historical data |
| **Delete** | Permanently removes — only possible if no transactions reference this payment type |
Deleting a payment type that has been used in past transactions is not allowed. Deactivate it instead to keep your historical records intact.
## Frequently Asked Questions
The list is backend-driven, so it can vary by account, but commonly available processors include:
* **Stripe**: Credit/debit cards via Stripe Checkout, for online ordering
* **Share Commerce**: Physical countertop card terminal, for in-person POS payments
* **Share Commerce ePay**: Online payment gateway, for QR/web ordering
Contact your account manager if you need a processor that isn't in your dropdown.
Check these things in order:
**For Stripe:**
1. Your Secret Key starts with `sk_live_` (production) or `sk_test_` (testing) — don't mix them
2. The Webhook Secret starts with `whsec_` and matches exactly what is shown in Stripe Dashboard → Developers → Webhooks → your endpoint → Signing secret
3. Your payment type is set to Active
**For Share Commerce (terminal):**
1. The Terminal IP Address is correct and the terminal is on the same network as your POS
2. The Terminal Port matches what's configured on the device (default `8890`)
3. The Terminal Model selected matches your actual hardware
**For Share Commerce ePay:**
1. Your Merchant ID and Secret Key are correct for the selected Environment (staging vs. production)
2. Your merchant account is active and verified at Share Commerce
3. Your payment type is set to Active
See [Payment Issues](/troubleshooting/payment-issues) for more help.
Cash types do not require a processor — the cashier records the amount received and the system calculates change. Card/online types typically have a processor that handles the transaction electronically. You can create as many types as you need (e.g. separate types for Visa and Amex if you want to track them separately).
Log in to [dashboard.stripe.com](https://dashboard.stripe.com), go to **Developers → API keys**. Use the **Secret Key** (not the Publishable Key). See [Stripe Setup](/online-ordering/stripe-setup) for a step-by-step guide.
Log in to your Share Commerce Merchant Portal to find your **Merchant ID** and **Secret Key**. See [Share Commerce Setup](/online-ordering/sharecommerce-setup) for a step-by-step guide. If you're instead setting up the physical countertop terminal, there's no merchant portal step — you just need the terminal's IP address and model.
## Related
Connect Stripe for online payments
Connect Share Commerce ePay for QR/online ordering
Configure general tenant and device settings
Troubleshoot payment problems