> ## Documentation Index
> Fetch the complete documentation index at: https://docs.duitpos.com/llms.txt
> Use this file to discover all available pages before exploring further.
# Tables
> Set up your floor plan, table QR codes, and dine-in ordering behavior.
**Tables** represent the physical tables in your dining area — the ones customers sit at and scan a QR code to order from. Each table belongs to a Location and, optionally, an Area (a zone like "Main Floor" or "Patio"). Getting a table's Location right is what makes its QR code work at all, so this page walks through that carefully.
 ## Screen Layout
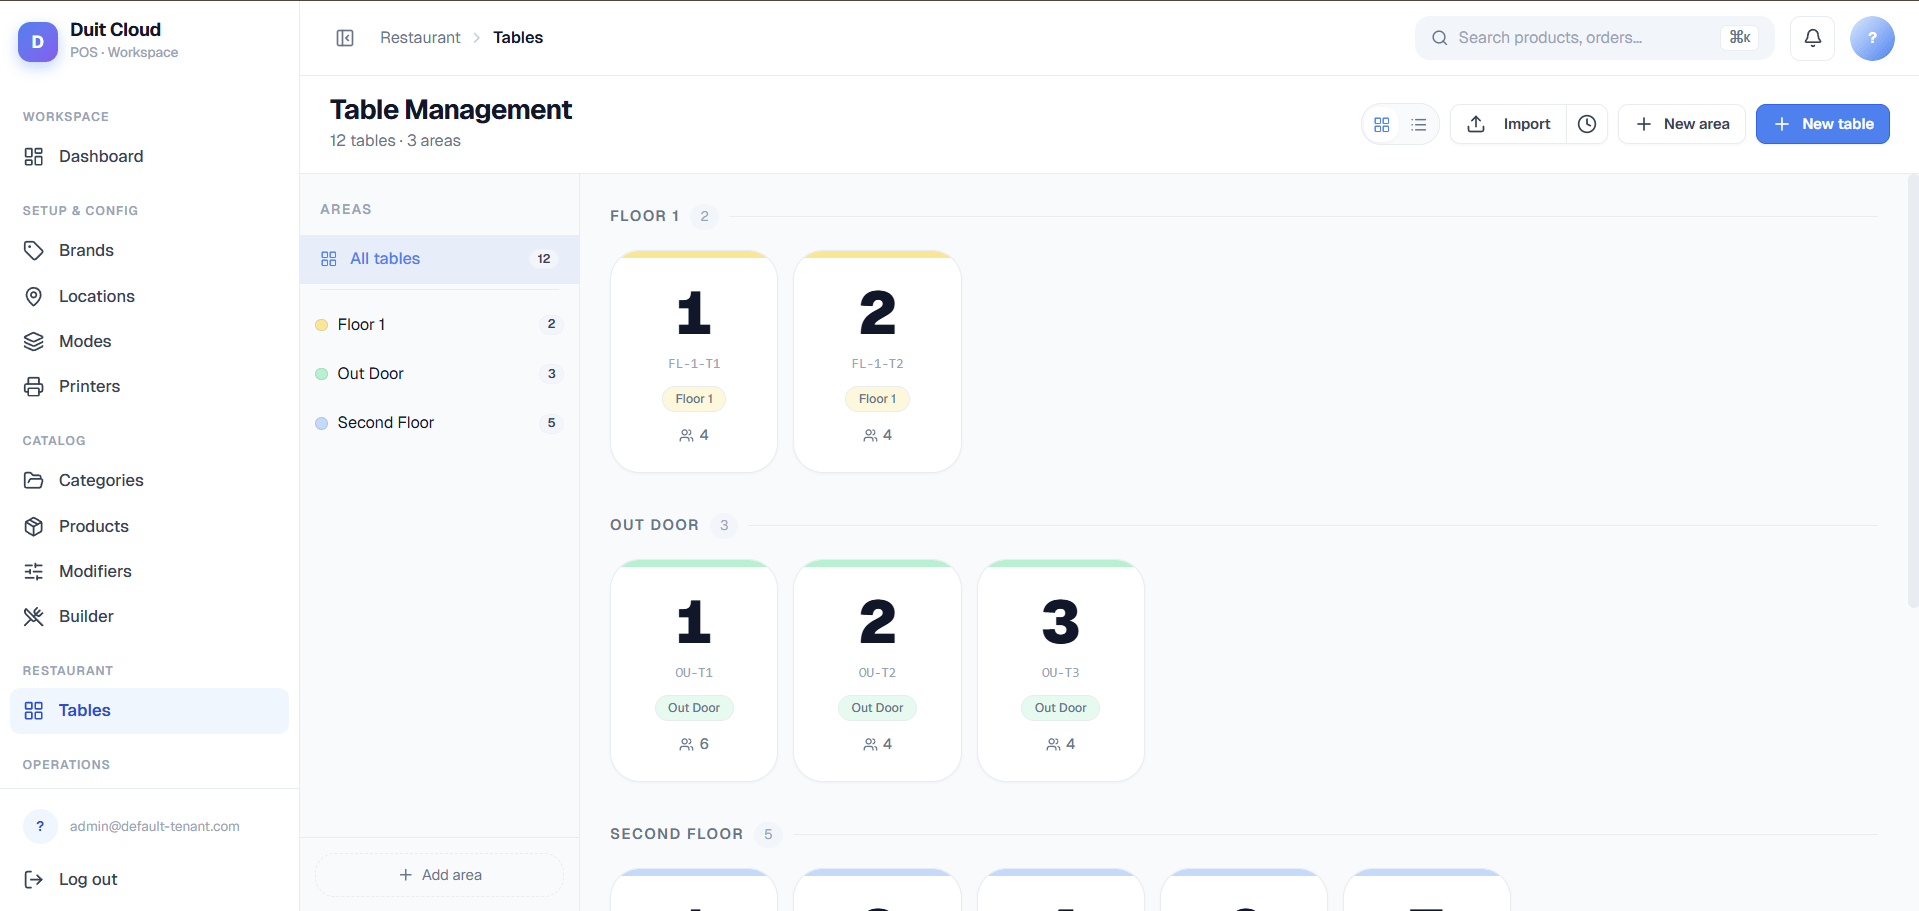
The Tables screen is split into two panes. On the left, the **Area sidebar** lists your color-coded areas (e.g. Main Floor, Patio, Bar) with a table count for each, plus Edit/Delete controls and an **Add area** button. On the right, the top bar has a **Location** filter, a **Grid/List** view toggle, **Bulk Import**, and buttons for **New area** and **New table**.
* **Grid view** shows tables as visual floor-plan cards, grouped by area — useful for a quick visual layout check.
* **List view** shows a data table with columns for **#**, **Label**, **Area** (colored badge), **Capacity**, **Status**, and row actions (QR code icon, Edit, Delete).
## Fields
### Table Fields
| Field | Required | Description |
| ----------------- | ------------------------- | ---------------------------------------------------------------------------------------------------------------------- |
| **Table Number** | Yes | The physical table number, used to auto-generate the Label |
| **Label** | Auto-generated (editable) | Display name in the format `{AreaPrefix}-T{number}`, e.g. `FL1-T3`. Must be unique within the location |
| **Capacity** | No | Maximum number of guests the table seats. Defaults to `4` |
| **Area** | No | Which zone this table belongs to, or "No area" |
| **Location** | Yes | The branch/outlet this table physically sits in — see [Location Mapping](#location-mapping) below |
| **Table session** | Yes | Controls how orders at this table are grouped into bills — see [Table Session Behavior](#table-session-behavior) below |
| **Active** | No | Toggle off to hide this table from the floor plan and block new QR orders to it |
### Area Fields
| Field | Required | Description |
| -------------- | -------- | ------------------------------------------------------------ |
| **Name** | Yes | The zone name, e.g. `Main Floor`, `Patio`, `Bar` |
| **Colour** | No | Highlight colour shown on the area badge and floor-plan grid |
| **Sort Order** | Auto | Controls display order in the sidebar and floor-plan view |
Areas are purely organizational — they group tables visually and generate the Label prefix (e.g. `FL1` for "Main Floor"). They have no effect on ordering logic. What actually gates ordering is the table's **Location**.
## Location Mapping
Every table must be assigned to one **Location** (branch/outlet) — this isn't just for organizing your table list, it's what makes the table's QR code work at all.
If a table has no Location assigned, a customer scanning its QR code to order is **hard-blocked** with the error *"This table is not mapped to a location"* — they cannot place an order, full stop. If a customer reaches a table's ordering link while a **different** location is active in their session, they're blocked too, with *"Table does not belong to the selected location"*.
**Practical guidance:** when you open a new branch, create that branch's tables (or reassign existing ones) to its Location **before** you generate and print any QR codes. Printing QR codes for tables that aren't mapped yet means reprinting them later — the link itself is built from the table's location.
## Table Session Behavior
The **Table session** setting (`session_reset_mode`) decides how orders placed at the same table are grouped into a bill. It's a per-table setting, not a global one — bar tables and dining tables can each use a different mode.
| Option | Value | What happens |
| --------------------------------- | ----------- | ----------------------------------------------------------------------------------- |
| **One running bill until closed** | `on_close` | All orders placed at the table land on the **same ticket** until staff close it out |
| **New order each time** | `per_order` | Every scan/order starts a **brand-new, separate ticket** |
**Example — "One running bill until closed":** three different guests at the same table scan the QR at different points during the meal and each order something. All three orders land on one running bill. Staff close it out once, when the table is done. This is the right default for normal dine-in table service.
**Example — "New order each time":** a customer scans, orders, and leaves. Later, someone else sits at the same physical table and scans the same QR — this creates a completely separate ticket, billed independently, even though it's the same table. This suits fast-casual or self-order-and-leave setups where each order should be its own bill rather than accumulating.
## Create a Table
Click **Tables** in the left sidebar, under Restaurant.
Use an existing area or click **Add area** to create one, e.g. `Main Floor`. Skip this if you don't need zones.
Enter the Table Number, Capacity, and choose the Area.
Assign the branch this table physically belongs to. This is required — without it, the table's QR code will not work for customers.
Pick **One running bill until closed** for normal dine-in service, or **New order each time** for fast-casual, self-order setups.
Click **Create**. The table appears immediately in the floor plan and table list.
## Generate a Table QR Code
Click the **QR code icon** on any table row (list view) or card (grid view) to open the Table QR dialog. It generates a scannable QR code and a copyable link in the form:
```
{QR_BASE}/{tenant}/{setupCode}/location/{locationId}/order-mode/{orderModeId}/table/{tableId}
```
To generate a working link, the dialog needs:
* A **Cliq-type Setup** selected — Cliq is the internal name for a QR self-order device/channel profile. See [Setup](/features/setup) if you haven't created one yet.
* An **Order Mode** — a dropdown that defaults to a dine-in-type mode, but you can pick any active order mode.
From the dialog you can **Download PNG** (for printing and placing on the table) or **Copy link** (to share digitally).
If the table has no Location assigned, the QR dialog blocks and shows a warning asking you to assign a location first. This is the same location-mapping rule described above — there's no way around it, because the link itself is built using the table's location.
**Before a table's QR code will actually work for customers**, make sure you have: (1) the table mapped to a Location, (2) at least one active Cliq-type [Setup](/features/setup), (3) an Order Mode configured, and (4) a payment processor — [Stripe](/online-ordering/stripe-setup) or Share Commerce ePay — set up if you want customers to pay online. See [QR Setup](/online-ordering/qr-setup) for the full walkthrough.
## Bulk Import
Use **Bulk Import** to upload a CSV of tables in one go, the same way you would for other list screens in DuitPOS.
## Frequently Asked Questions
Almost always a missing Location. Open the table and confirm a Location is assigned — if it's blank, customers scanning the code get blocked with "This table is not mapped to a location." Also confirm you have an active Cliq-type Setup and an Order Mode selected in the QR dialog.
Yes. Area is purely organizational and doesn't appear in the QR link, so changing a table's Area does not affect its existing QR code. Changing its **Location**, however, does — that requires regenerating and reprinting the QR code.
Use "One running bill until closed" for standard table service, where guests order over time and staff settle one bill at the end. Use "New order each time" for fast-casual or self-order setups where each scan should be billed as its own separate ticket, even at the same physical table.
No. Deletion is blocked while any tables are still assigned to that area. Reassign or delete those tables first, or leave the area in place and just deactivate it.
## Related
Create and manage branches/outlets
Create the Cliq-type device profile QR ordering needs
Configure the order mode used by table QR links
Full walkthrough for getting QR ordering live
## Screen Layout
The Tables screen is split into two panes. On the left, the **Area sidebar** lists your color-coded areas (e.g. Main Floor, Patio, Bar) with a table count for each, plus Edit/Delete controls and an **Add area** button. On the right, the top bar has a **Location** filter, a **Grid/List** view toggle, **Bulk Import**, and buttons for **New area** and **New table**.
* **Grid view** shows tables as visual floor-plan cards, grouped by area — useful for a quick visual layout check.
* **List view** shows a data table with columns for **#**, **Label**, **Area** (colored badge), **Capacity**, **Status**, and row actions (QR code icon, Edit, Delete).
## Fields
### Table Fields
| Field | Required | Description |
| ----------------- | ------------------------- | ---------------------------------------------------------------------------------------------------------------------- |
| **Table Number** | Yes | The physical table number, used to auto-generate the Label |
| **Label** | Auto-generated (editable) | Display name in the format `{AreaPrefix}-T{number}`, e.g. `FL1-T3`. Must be unique within the location |
| **Capacity** | No | Maximum number of guests the table seats. Defaults to `4` |
| **Area** | No | Which zone this table belongs to, or "No area" |
| **Location** | Yes | The branch/outlet this table physically sits in — see [Location Mapping](#location-mapping) below |
| **Table session** | Yes | Controls how orders at this table are grouped into bills — see [Table Session Behavior](#table-session-behavior) below |
| **Active** | No | Toggle off to hide this table from the floor plan and block new QR orders to it |
### Area Fields
| Field | Required | Description |
| -------------- | -------- | ------------------------------------------------------------ |
| **Name** | Yes | The zone name, e.g. `Main Floor`, `Patio`, `Bar` |
| **Colour** | No | Highlight colour shown on the area badge and floor-plan grid |
| **Sort Order** | Auto | Controls display order in the sidebar and floor-plan view |
Areas are purely organizational — they group tables visually and generate the Label prefix (e.g. `FL1` for "Main Floor"). They have no effect on ordering logic. What actually gates ordering is the table's **Location**.
## Location Mapping
Every table must be assigned to one **Location** (branch/outlet) — this isn't just for organizing your table list, it's what makes the table's QR code work at all.
If a table has no Location assigned, a customer scanning its QR code to order is **hard-blocked** with the error *"This table is not mapped to a location"* — they cannot place an order, full stop. If a customer reaches a table's ordering link while a **different** location is active in their session, they're blocked too, with *"Table does not belong to the selected location"*.
**Practical guidance:** when you open a new branch, create that branch's tables (or reassign existing ones) to its Location **before** you generate and print any QR codes. Printing QR codes for tables that aren't mapped yet means reprinting them later — the link itself is built from the table's location.
## Table Session Behavior
The **Table session** setting (`session_reset_mode`) decides how orders placed at the same table are grouped into a bill. It's a per-table setting, not a global one — bar tables and dining tables can each use a different mode.
| Option | Value | What happens |
| --------------------------------- | ----------- | ----------------------------------------------------------------------------------- |
| **One running bill until closed** | `on_close` | All orders placed at the table land on the **same ticket** until staff close it out |
| **New order each time** | `per_order` | Every scan/order starts a **brand-new, separate ticket** |
**Example — "One running bill until closed":** three different guests at the same table scan the QR at different points during the meal and each order something. All three orders land on one running bill. Staff close it out once, when the table is done. This is the right default for normal dine-in table service.
**Example — "New order each time":** a customer scans, orders, and leaves. Later, someone else sits at the same physical table and scans the same QR — this creates a completely separate ticket, billed independently, even though it's the same table. This suits fast-casual or self-order-and-leave setups where each order should be its own bill rather than accumulating.
## Create a Table
Click **Tables** in the left sidebar, under Restaurant.
Use an existing area or click **Add area** to create one, e.g. `Main Floor`. Skip this if you don't need zones.
Enter the Table Number, Capacity, and choose the Area.
Assign the branch this table physically belongs to. This is required — without it, the table's QR code will not work for customers.
Pick **One running bill until closed** for normal dine-in service, or **New order each time** for fast-casual, self-order setups.
Click **Create**. The table appears immediately in the floor plan and table list.
## Generate a Table QR Code
Click the **QR code icon** on any table row (list view) or card (grid view) to open the Table QR dialog. It generates a scannable QR code and a copyable link in the form:
```
{QR_BASE}/{tenant}/{setupCode}/location/{locationId}/order-mode/{orderModeId}/table/{tableId}
```
To generate a working link, the dialog needs:
* A **Cliq-type Setup** selected — Cliq is the internal name for a QR self-order device/channel profile. See [Setup](/features/setup) if you haven't created one yet.
* An **Order Mode** — a dropdown that defaults to a dine-in-type mode, but you can pick any active order mode.
From the dialog you can **Download PNG** (for printing and placing on the table) or **Copy link** (to share digitally).
If the table has no Location assigned, the QR dialog blocks and shows a warning asking you to assign a location first. This is the same location-mapping rule described above — there's no way around it, because the link itself is built using the table's location.
**Before a table's QR code will actually work for customers**, make sure you have: (1) the table mapped to a Location, (2) at least one active Cliq-type [Setup](/features/setup), (3) an Order Mode configured, and (4) a payment processor — [Stripe](/online-ordering/stripe-setup) or Share Commerce ePay — set up if you want customers to pay online. See [QR Setup](/online-ordering/qr-setup) for the full walkthrough.
## Bulk Import
Use **Bulk Import** to upload a CSV of tables in one go, the same way you would for other list screens in DuitPOS.
## Frequently Asked Questions
Almost always a missing Location. Open the table and confirm a Location is assigned — if it's blank, customers scanning the code get blocked with "This table is not mapped to a location." Also confirm you have an active Cliq-type Setup and an Order Mode selected in the QR dialog.
Yes. Area is purely organizational and doesn't appear in the QR link, so changing a table's Area does not affect its existing QR code. Changing its **Location**, however, does — that requires regenerating and reprinting the QR code.
Use "One running bill until closed" for standard table service, where guests order over time and staff settle one bill at the end. Use "New order each time" for fast-casual or self-order setups where each scan should be billed as its own separate ticket, even at the same physical table.
No. Deletion is blocked while any tables are still assigned to that area. Reassign or delete those tables first, or leave the area in place and just deactivate it.
## Related
Create and manage branches/outlets
Create the Cliq-type device profile QR ordering needs
Configure the order mode used by table QR links
Full walkthrough for getting QR ordering live