> ## Documentation Index
> Fetch the complete documentation index at: https://docs.duitpos.com/llms.txt
> Use this file to discover all available pages before exploring further.
# Users & Roles
> Manage admin panel accounts and define permission templates for your team.
**Users** are admin panel accounts that allow staff to log in and manage DuitPOS. **Roles** are permission templates — reusable sets of capabilities that you assign to users. Together, they control who can access what in your restaurant's management dashboard. Every user must have exactly one role to function; without a role, they cannot log in.
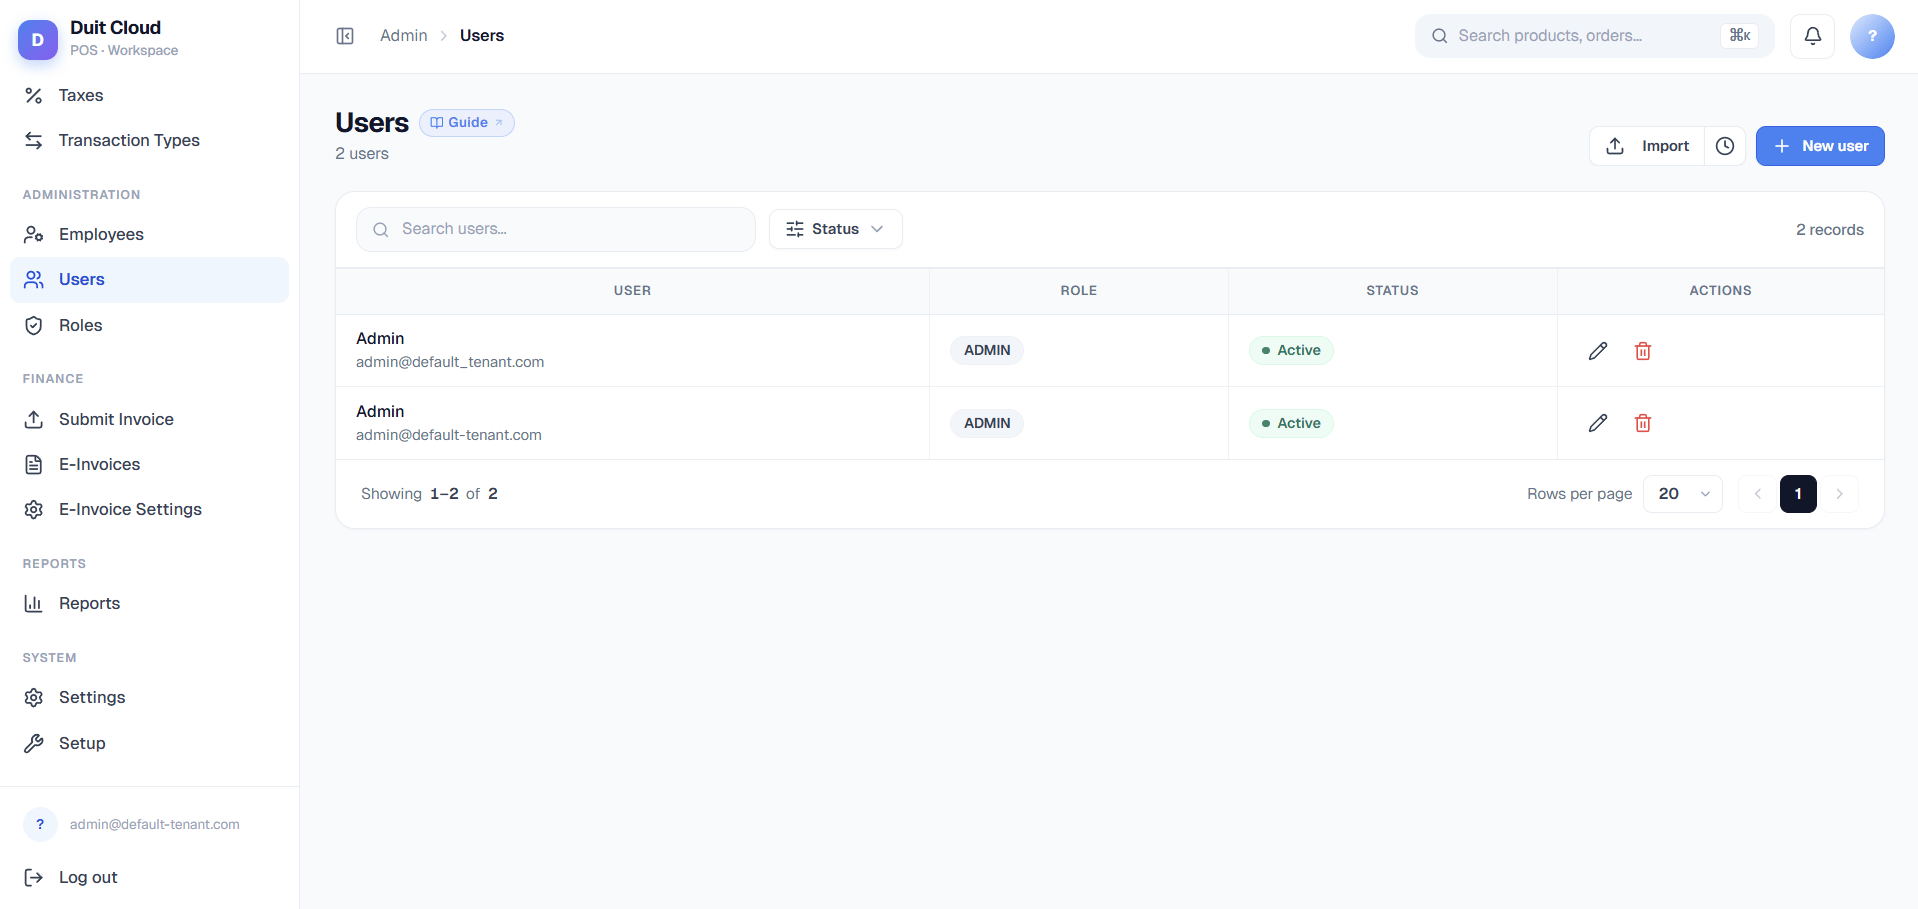 ## Users
**Users** are the people who can log in to the DuitPOS admin panel. A user is identified by their email address and password, and gets their permissions from the single role you assign them. Note: Users in DuitPOS are different from **Employees** (POS staff with PINs and terminals) — see the [Employees](/features/employees) page to manage point-of-sale workers.
### User Fields
| Field | Required | Description |
| ------------ | ----------------- | ---------------------------------------------------------------------------------------------------------------------------------------------------- |
| **Name** | Yes | Display name shown in reports and audit logs. Can be changed anytime. |
| **Email** | Yes | Login username — must be unique. Set once; cannot be changed later (delete and recreate if needed). |
| **Password** | Yes (create only) | Initial password you set. User should change it on first login. Not editable after creation; user can reset via "Forgot Password" on the login page. |
| **Role** | Yes | Exactly one role. Determines all permissions available to this user. Can be changed without affecting historical data. |
| **Active** | Optional | Toggle on/off to enable/disable login without deleting the account. Historical sales and audit logs are preserved when a user is deactivated. |
### Create a User
Inviting a new user means creating an admin panel account and assigning them a role that matches their responsibilities — for example, **Manager** (full access) or **Cashier** (POS-only, no admin).
In the DuitPOS sidebar, click **Users & Roles** → **Users**.
A dialog will open to create a new account.
* **Name**: Enter the user's display name (e.g., "Ali Manager").
* **Email**: Enter a unique email address. This is their login username.
* **Password**: Set a temporary password (at least 6 characters). Share it securely — not via the same channel as the email.
* **Role**: Select one role from the dropdown (e.g., "Manager", "Cashier"). The user will get all permissions in that role.
* **Active**: Toggle on (default) so they can log in immediately.
Click **Create**. The account is now ready. Share the email and temporary password with the user; ask them to change the password on first login.
Start with two template roles: a **Manager** role (grant all permissions) for yourself or senior staff, and a **Cashier** role (POS-only, no Manage or Users sections) for frontline staff. You can fine-tune permissions anytime without recreating roles.
### Edit a User
After creation, you can change a user's name and active status — but not their email, password, or role without deleting and recreating them.
Use the **Status** filter to quickly find Active or Inactive users.
The edit dialog opens showing only Name and Active fields.
* **Name**: Update the display name if it changes (e.g., on marriage/promotion).
* **Active**: Toggle off to block login (preserves all historical data), or on to re-enable access.
Click **Update**. Changes take effect on their next login.
**Email and password cannot be changed after creation.** If a user's email must change, delete the old account and create a new one with the new email. For password resets, ask the user to click "Forgot Password" on the login page; they will receive a reset link via email.
**Never remove your own admin role while logged in.** Doing so will lock you out of the Users page and all admin functions.
### List & Filters
The Users list shows all admin accounts in a table with columns for **Name + Email**, **Role**, and **Status** (Active/Inactive). Use the **Status** filter at the top to quickly view only active or inactive users. Click an action icon to edit or delete (delete permanently removes historical records associated with that user).
***
## Roles
**Roles** are named templates of permissions. Instead of setting permissions one-by-one for each user, you create a role (e.g., "Supervisor"), choose which permissions it should have, and then assign that role to all users who need the same capabilities. A user gets exactly one role, so all their permissions come from that single role.
### Role Fields
| Field | Required | Description |
| --------------- | -------- | --------------------------------------------------------------------------------------------------------------------------------------------------------------------------------------------------------- |
| **Name** | Yes | Role name shown in user assignment dropdowns (e.g., "Manager", "Cashier", "Supervisor"). |
| **Description** | Optional | A note explaining the role's purpose (e.g., "Can manage inventory and staff, but not payment settings"). Shown in tooltips and role list. |
| **Permissions** | Yes | A matrix of toggles organized by function (All / Admin / POS / KDS / Kiosk). Permissions are saved as a `permission_ids` array. No two roles can have identical permission sets if one is a direct clone. |
### Permission Matrix UI
When you create or edit a role, the **Permissions** panel is the main interface. It uses a visual matrix to show all available permissions grouped by function:
* **Filter Tabs** (top): All, Admin, POS, KDS, Kiosk. Click a tab to show only permissions relevant to that module. (For example, a Cashier might only need POS; a manager needs Admin.)
* **Permission Cards**: Each card represents a business function (e.g., "Users & Roles", "Tax", "Products", "Reports"). Shows the resource label and a count like "2/4 selected" (2 of 4 permissions in this resource are enabled).
* **Toggle Permissions**: Click individual permission pills within a card to toggle them on/off. A pill shows the permission action (Create, List, Update, Delete).
* **Select All / Deselect All**: At the top-right of each card, a checkbox lets you quickly toggle all permissions in that resource at once.
* **Unsaved Changes Indicator**: If you've made changes, a badge or button appears (e.g., "3 unsaved"). Click **Save** to apply changes, or **Discard** to revert.
Example: If you create a "Inventory Manager" role, you might enable all Permissions for Products/Categories/Modifiers/Bulk Pricing (tab: Catalog), but leave POS and KDS permissions off so they cannot operate a terminal.
### Create a Role
Click the **Roles** tab in the Users & Roles section.
A sidebar and permission matrix will appear on the right. Fill in:
* **Name**: e.g., "Supervisor", "Inventory Specialist"
* **Description** (optional): e.g., "Can manage inventory, tax, and reports but cannot process payments"
Use the **Filter Tabs** to navigate by function (All / Admin / POS / KDS / Kiosk). Click individual permission pills to enable them, or use the "Select All" checkbox in each resource card to bulk-toggle. Watch the "N/M selected" count update as you choose.
Click the **Save** button at the bottom. The role is now available to assign to users.
Common role templates to start with:
* **Manager**: Enable all Admin permissions (Users, Roles, Tax, Payment Types, etc.). Typically also enable all POS permissions so managers can troubleshoot terminals.
* **Cashier**: Enable only POS List/Create/Update. No Manage, Users, or Reports.
* **Inventory Specialist**: Enable all permissions in the Catalog group (Products, Categories, Modifiers), plus Reports → view (but not full admin access).
### Edit a Role
The left sidebar shows all existing roles.
The role details and permission matrix load on the right.
* Update **Name** or **Description** fields.
* Toggle permissions in the matrix. Use Filter Tabs to find the ones you need.
Click **Save** to apply changes, or **Discard** to revert. Changes take effect on users' next login.
**Changing a role's permissions affects all users with that role.** If you edit a "Cashier" role to remove POS List permission, all cashiers will lose that permission on their next login.
**If you delete a role that users have assigned, those users lose that role.** They will be unable to log in until reassigned to a different role. DuitPOS will show a "role deleted" error message if they try to access the dashboard. Always reassign users to a new role before deleting an old one.
### Delete a Role
You can only delete a role if no users are currently assigned to it. The system will warn you if users depend on the role and prevent deletion until they are reassigned.
Select the role in the left sidebar.
Confirm the deletion. The role and all its permissions are permanently removed.
***
## Frequently Asked Questions
No. In DuitPOS, each user is assigned exactly one role. The user gets all permissions defined in that single role. If you need different permission sets, create multiple roles and assign each user to the one that best matches their job.
No. Email is the login username and cannot be edited after account creation. If a user's email must change (e.g., they leave your organization), delete the old account and create a new user with the correct email. Their historical data (sales, audit logs) will be preserved in reports by their user ID, but the name will show as deleted or orphaned.
If you removed critical permissions from a role, users may see a "permission denied" error when accessing parts of the dashboard they used before. They will still be able to log in and access other functions. To restore access, either re-enable the permissions in the role, or reassign the users to a different role that has those permissions. Changes take effect on their next login.
There is no direct clone function. However, you can manually recreate a similar role by: (1) writing down the permissions from an existing role, (2) creating a new role with a new name, (3) selecting the same permissions from the matrix. For frequently-used role templates, consider documenting their permission sets (e.g., in a spreadsheet) so you can replicate them quickly.
Yes. Deactivating a user only blocks their login. All historical data (sales, voided items, shift logs) linked to that user is preserved in reports and audit trails. Deactivation is reversible — click Edit, toggle Active on, and they can log in again. Permanent deletion removes the user account; some reports may show them as "deleted user" for historical accuracy.
Permissions are action-based. Each role contains a set of permissions like "Users:Create", "Products:Update", "Reports:View". When a user logs in, DuitPOS checks their role's permissions and shows/hides dashboard sections and buttons accordingly. If a permission is missing, the user sees "Access Denied" for that feature. See [Permissions](/setup/permissions) for the complete list of available permissions.
***
## Related
See what each permission controls and which features require which permissions.
Manage POS staff records, PINs, and terminal assignments — separate from admin users.
Configure security settings, password policies, and other account-level preferences.
Troubleshoot sign-in issues, password resets, and permission errors.
## Users
**Users** are the people who can log in to the DuitPOS admin panel. A user is identified by their email address and password, and gets their permissions from the single role you assign them. Note: Users in DuitPOS are different from **Employees** (POS staff with PINs and terminals) — see the [Employees](/features/employees) page to manage point-of-sale workers.
### User Fields
| Field | Required | Description |
| ------------ | ----------------- | ---------------------------------------------------------------------------------------------------------------------------------------------------- |
| **Name** | Yes | Display name shown in reports and audit logs. Can be changed anytime. |
| **Email** | Yes | Login username — must be unique. Set once; cannot be changed later (delete and recreate if needed). |
| **Password** | Yes (create only) | Initial password you set. User should change it on first login. Not editable after creation; user can reset via "Forgot Password" on the login page. |
| **Role** | Yes | Exactly one role. Determines all permissions available to this user. Can be changed without affecting historical data. |
| **Active** | Optional | Toggle on/off to enable/disable login without deleting the account. Historical sales and audit logs are preserved when a user is deactivated. |
### Create a User
Inviting a new user means creating an admin panel account and assigning them a role that matches their responsibilities — for example, **Manager** (full access) or **Cashier** (POS-only, no admin).
In the DuitPOS sidebar, click **Users & Roles** → **Users**.
A dialog will open to create a new account.
* **Name**: Enter the user's display name (e.g., "Ali Manager").
* **Email**: Enter a unique email address. This is their login username.
* **Password**: Set a temporary password (at least 6 characters). Share it securely — not via the same channel as the email.
* **Role**: Select one role from the dropdown (e.g., "Manager", "Cashier"). The user will get all permissions in that role.
* **Active**: Toggle on (default) so they can log in immediately.
Click **Create**. The account is now ready. Share the email and temporary password with the user; ask them to change the password on first login.
Start with two template roles: a **Manager** role (grant all permissions) for yourself or senior staff, and a **Cashier** role (POS-only, no Manage or Users sections) for frontline staff. You can fine-tune permissions anytime without recreating roles.
### Edit a User
After creation, you can change a user's name and active status — but not their email, password, or role without deleting and recreating them.
Use the **Status** filter to quickly find Active or Inactive users.
The edit dialog opens showing only Name and Active fields.
* **Name**: Update the display name if it changes (e.g., on marriage/promotion).
* **Active**: Toggle off to block login (preserves all historical data), or on to re-enable access.
Click **Update**. Changes take effect on their next login.
**Email and password cannot be changed after creation.** If a user's email must change, delete the old account and create a new one with the new email. For password resets, ask the user to click "Forgot Password" on the login page; they will receive a reset link via email.
**Never remove your own admin role while logged in.** Doing so will lock you out of the Users page and all admin functions.
### List & Filters
The Users list shows all admin accounts in a table with columns for **Name + Email**, **Role**, and **Status** (Active/Inactive). Use the **Status** filter at the top to quickly view only active or inactive users. Click an action icon to edit or delete (delete permanently removes historical records associated with that user).
***
## Roles
**Roles** are named templates of permissions. Instead of setting permissions one-by-one for each user, you create a role (e.g., "Supervisor"), choose which permissions it should have, and then assign that role to all users who need the same capabilities. A user gets exactly one role, so all their permissions come from that single role.
### Role Fields
| Field | Required | Description |
| --------------- | -------- | --------------------------------------------------------------------------------------------------------------------------------------------------------------------------------------------------------- |
| **Name** | Yes | Role name shown in user assignment dropdowns (e.g., "Manager", "Cashier", "Supervisor"). |
| **Description** | Optional | A note explaining the role's purpose (e.g., "Can manage inventory and staff, but not payment settings"). Shown in tooltips and role list. |
| **Permissions** | Yes | A matrix of toggles organized by function (All / Admin / POS / KDS / Kiosk). Permissions are saved as a `permission_ids` array. No two roles can have identical permission sets if one is a direct clone. |
### Permission Matrix UI
When you create or edit a role, the **Permissions** panel is the main interface. It uses a visual matrix to show all available permissions grouped by function:
* **Filter Tabs** (top): All, Admin, POS, KDS, Kiosk. Click a tab to show only permissions relevant to that module. (For example, a Cashier might only need POS; a manager needs Admin.)
* **Permission Cards**: Each card represents a business function (e.g., "Users & Roles", "Tax", "Products", "Reports"). Shows the resource label and a count like "2/4 selected" (2 of 4 permissions in this resource are enabled).
* **Toggle Permissions**: Click individual permission pills within a card to toggle them on/off. A pill shows the permission action (Create, List, Update, Delete).
* **Select All / Deselect All**: At the top-right of each card, a checkbox lets you quickly toggle all permissions in that resource at once.
* **Unsaved Changes Indicator**: If you've made changes, a badge or button appears (e.g., "3 unsaved"). Click **Save** to apply changes, or **Discard** to revert.
Example: If you create a "Inventory Manager" role, you might enable all Permissions for Products/Categories/Modifiers/Bulk Pricing (tab: Catalog), but leave POS and KDS permissions off so they cannot operate a terminal.
### Create a Role
Click the **Roles** tab in the Users & Roles section.
A sidebar and permission matrix will appear on the right. Fill in:
* **Name**: e.g., "Supervisor", "Inventory Specialist"
* **Description** (optional): e.g., "Can manage inventory, tax, and reports but cannot process payments"
Use the **Filter Tabs** to navigate by function (All / Admin / POS / KDS / Kiosk). Click individual permission pills to enable them, or use the "Select All" checkbox in each resource card to bulk-toggle. Watch the "N/M selected" count update as you choose.
Click the **Save** button at the bottom. The role is now available to assign to users.
Common role templates to start with:
* **Manager**: Enable all Admin permissions (Users, Roles, Tax, Payment Types, etc.). Typically also enable all POS permissions so managers can troubleshoot terminals.
* **Cashier**: Enable only POS List/Create/Update. No Manage, Users, or Reports.
* **Inventory Specialist**: Enable all permissions in the Catalog group (Products, Categories, Modifiers), plus Reports → view (but not full admin access).
### Edit a Role
The left sidebar shows all existing roles.
The role details and permission matrix load on the right.
* Update **Name** or **Description** fields.
* Toggle permissions in the matrix. Use Filter Tabs to find the ones you need.
Click **Save** to apply changes, or **Discard** to revert. Changes take effect on users' next login.
**Changing a role's permissions affects all users with that role.** If you edit a "Cashier" role to remove POS List permission, all cashiers will lose that permission on their next login.
**If you delete a role that users have assigned, those users lose that role.** They will be unable to log in until reassigned to a different role. DuitPOS will show a "role deleted" error message if they try to access the dashboard. Always reassign users to a new role before deleting an old one.
### Delete a Role
You can only delete a role if no users are currently assigned to it. The system will warn you if users depend on the role and prevent deletion until they are reassigned.
Select the role in the left sidebar.
Confirm the deletion. The role and all its permissions are permanently removed.
***
## Frequently Asked Questions
No. In DuitPOS, each user is assigned exactly one role. The user gets all permissions defined in that single role. If you need different permission sets, create multiple roles and assign each user to the one that best matches their job.
No. Email is the login username and cannot be edited after account creation. If a user's email must change (e.g., they leave your organization), delete the old account and create a new user with the correct email. Their historical data (sales, audit logs) will be preserved in reports by their user ID, but the name will show as deleted or orphaned.
If you removed critical permissions from a role, users may see a "permission denied" error when accessing parts of the dashboard they used before. They will still be able to log in and access other functions. To restore access, either re-enable the permissions in the role, or reassign the users to a different role that has those permissions. Changes take effect on their next login.
There is no direct clone function. However, you can manually recreate a similar role by: (1) writing down the permissions from an existing role, (2) creating a new role with a new name, (3) selecting the same permissions from the matrix. For frequently-used role templates, consider documenting their permission sets (e.g., in a spreadsheet) so you can replicate them quickly.
Yes. Deactivating a user only blocks their login. All historical data (sales, voided items, shift logs) linked to that user is preserved in reports and audit trails. Deactivation is reversible — click Edit, toggle Active on, and they can log in again. Permanent deletion removes the user account; some reports may show them as "deleted user" for historical accuracy.
Permissions are action-based. Each role contains a set of permissions like "Users:Create", "Products:Update", "Reports:View". When a user logs in, DuitPOS checks their role's permissions and shows/hides dashboard sections and buttons accordingly. If a permission is missing, the user sees "Access Denied" for that feature. See [Permissions](/setup/permissions) for the complete list of available permissions.
***
## Related
See what each permission controls and which features require which permissions.
Manage POS staff records, PINs, and terminal assignments — separate from admin users.
Configure security settings, password policies, and other account-level preferences.
Troubleshoot sign-in issues, password resets, and permission errors.